| Lectures |
Store | Bio/Contact |
Sign Up | Schedule |
|
Zoom Lectures & Workshops |
Color: A Step-by-Step Tutorial (lecture)
How do I plan and make a quilt? Which comes first, the design idea or the fabric? How do I choose a color palette for a quilt? Step-by-step images illustrate my methods of choosing, auditioning, and editing fabrics based on color and pattern. A digital trunk show of quilts and wearables wraps it all up. One hour • Fee: $375
Magic Fabrics/Special Effects (lecture)
Put simply, “magic fabrics” give a quilt light and vitality. Some suggest light coming from below the surface (luminosity) or bouncing across the surface (luster). Others imply that see-through colors overlap to create new color mixtures (transparency). They typically display variations in value—light areas among darker areas, or light-to-dark gradations—and they often contain warm colors. A digital trunk show of fabrics, quilts, and wearables brings the concepts to life. One hour • Fee: $375
Color! Color! Color! (lecture)
Being “good with color” is more about practice than talent! This program begins with a look at the three color characteristics common to all quilts and garments: value, temperature, and intensity. These terms sound academic, yet they, as much as color itself, are the key to making great quilts. Learn how to use the color wheel to create fresh, unexpected color combinations. See how color affects texture and pattern. Images of quilts from nationally known quilters are followed by my quilts and a digital mini fashion show of wearables. One hour • Fee: $375
Note: PDF patterns are specified in the class descriptions, but hard-copy patterns are also available in my Store.
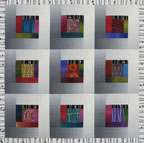
Learn about color, value, and pattern, plus my technique for making super-skinny strips in this modern-quilt workshop. Three related (but not matching) fabrics make up each center unit. Narrow black-and-white strips inserted asymmetrically between the "segments" define and separate the fabrics. You'll also learn how to cut and add the ombré borders to make it appear as if light is sweeping across the surface. Six hours • Fee $550 • PDF pattern required, $12 • Email me for Supply List
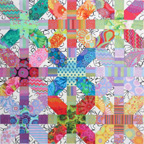
It was love at first sight when I saw this graphic block, traditionally known as “Album” made up in modern fabrics. Each block is its own cohesive "color story" and could easily stand alone. Put nine blocks together, and the bold (almost chaotic) pattern comes alive. The workshop begins with the concepts essential to making each block read—color, pattern, and value. I do a demo on cutting and piecing the block, which is a cinch, even for beginners. It's fast and it's fun! Six hours • Fee $550 • PDF pattern required, $8 • Email me for Supply List
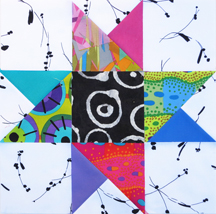
Ombré fabrics, with their subtle gradations in value and color, suggest luster and light in this minimalist quilt, which appeared in Modern Patchwork magazine. The center units are cut from Marcia Derse prints and assorted colored ombrés. The outer strips are a gray ombré. Feel free to “make it your own” by using other prints and solid fabrics! Six hours • Fee $550 • PDF pattern required, $8 • Email me for Supply List
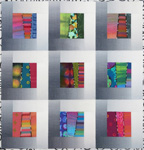
Transparent Squares (workshop)
![]()
Layered transparency—the illusion of layers of see-through color—is surprisingly easy to achieve when the values are just right. In this modern minimalist quilt, which appeared in Modern Patchwork magazine, light center squares seem to float above the darker shapes. Sections of gray ombré appear to flow underneath the blocks, enhancing the sense of light and movement. Six hours • Fee $550 • PDF pattern required, $8 • Email me for Supply List